
FCU Unit Installation
FCU (Fan Coil Unit) Installation: A Step-by-Step Guide:
Installing a Fan Coil Unit (FCU) is a crucial part of HVAC (Heating, Ventilation, and Air Conditioning) systems, especially in commercial and residential spaces looking for efficient temperature control. The FCU is responsible for heating or cooling air by using chilled water or hot water as its heat source. Proper installation ensures optimum performance and longevity of the system.
Here’s a step-by-step guide to the FCU installation process:
1. Choose the Right Location
The first step in the installation process is selecting the ideal location for the FCU. The unit should be placed in a well-ventilated area, away from heat sources or obstructions. It should also be positioned in a spot that allows the air to circulate freely throughout the room.
- Ensure the unit is mounted on a sturdy surface.
- It should be easily accessible for maintenance purposes.
- Keep the unit away from direct sunlight and humidity, as these can affect its performance.
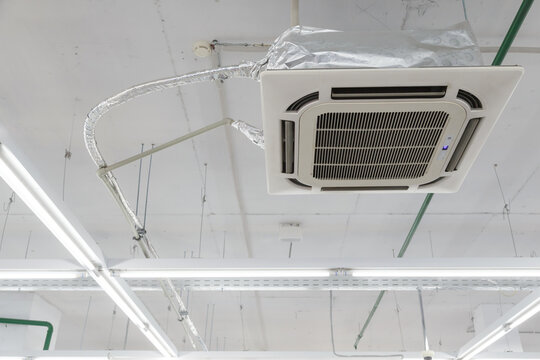
2. Mount the FCU
Once the location is determined, mount the fan coil unit.
- For wall-mounted units, secure the mounting brackets to the wall using suitable anchors or screws.
- For ceiling-mounted units, make sure to position the unit securely using support brackets that can bear the weight of the FCU.
- Always use a level when mounting the unit to ensure it sits evenly.
3. Connect the Water Pipes
FCUs rely on water for heating or cooling, so the next step is to connect the water pipes to the unit.
- For cooling: Connect the chilled water supply pipe to the inlet of the FCU and the return pipe to the outlet.
- For heating: Connect the hot water supply pipe to the inlet and the return pipe to the outlet.
- Ensure all pipes are tightly connected to prevent leaks. Use proper insulation to minimize energy loss.
4. Electrical Connections
Before connecting the unit to the power source, ensure the electrical installation meets the manufacturer’s specifications.
- Wiring: Connect the FCU to the power supply following the wiring diagram provided by the manufacturer. The wiring must be done by a licensed electrician.
- Control connections: Link the FCU to the control system (thermostat or central controller). This could involve connecting wires for temperature sensors, on/off switches, and remote control options.
5. Install the Drainage System
Most FCUs produce condensation when cooling the air, so a drainage system is necessary to prevent water from collecting inside the unit.
- Install a drain line from the FCU’s drainage outlet to a suitable discharge point.
- Ensure that the drain line slopes away from the unit to allow proper water flow.
- Use a pump for units installed in areas where gravity drainage isn’t feasible.
6. Test the System
Once everything is connected, it’s time to test the system to ensure everything is working as expected.
- Power on the FCU and check for proper airflow.
- Adjust the thermostat and confirm that the FCU responds correctly.
- Check the water flow and verify that there are no leaks in the pipes or drainage system.
- Run the system in both heating and cooling modes to ensure all functions are operational.
7. Final Adjustments
Make any necessary adjustments to the unit’s settings to optimize performance. This includes setting fan speed, temperature, and operating modes. Ensure the unit is operating efficiently and quietly.
8. Clean and Maintain
After installation, make sure to clean the unit and remove any dust or debris. Also, set up a regular maintenance schedule to check filters, water levels, and drainage systems.