Package Unit Installation
Package Unit Installation: A Step-by-Step Guide
A package unit is a complete HVAC (Heating, Ventilation, and Air Conditioning) system that houses all components, including the compressor, condenser, and evaporator coils, in a single unit. This system is commonly used in commercial buildings and large residential properties where space for separate units might be limited. Package units are known for their compactness and ease of installation. Proper installation is crucial to ensure optimal performance and efficiency.
Here’s a step-by-step guide to installing a package unit:
1. Preparation and Planning
Before starting the installation, it’s essential to prepare for the process and plan accordingly:
- Unit Selection: Ensure the package unit is properly sized for the space it will serve. Choosing the correct tonnage and capacity is crucial for effective cooling and heating.
- Location: Package units are typically installed on rooftops, ground-level slabs, or in utility areas. The location should provide sufficient airflow and easy access for maintenance.
- Tools and Materials: Gather all necessary tools and materials, including:
- Wrenches, screwdrivers, and pliers
- Drill and drill bits
- Level
- Pipe insulation
- Electrical cables and connectors
- Ductwork materials
- Condensate drain line
- Mounting pads or a concrete slab (if installing on the ground)
Ensure that the site is cleared and safe for installation.
2. Set Up the Installation Location
Once you’ve selected the appropriate location for the package unit, ensure the following:
- Level the Ground or Slab: If the unit will be installed on a ground slab, use a level to ensure the surface is flat and stable. If installing on a rooftop, confirm that the surface is able to support the weight of the unit.
- Install a Mounting Pad or Concrete Slab: A sturdy base is needed to support the package unit. Install a vibration isolation pad or concrete slab to minimize vibrations and noise during operation.
- Ensure Proper Drainage: The installation site should allow for proper drainage to avoid water buildup around the unit. Consider the direction of water flow when positioning the unit.
3. Position the Package Unit
- Lift the Unit: With the help of a lifting crane or equipment, carefully move the package unit into position. Ensure that it is aligned with the ductwork and plumbing connections.
- Place the Unit: Position the unit in its designated spot on the mounting pad or concrete slab. Use a level to ensure the unit is sitting evenly. Proper leveling ensures that the refrigerant and condensate flow correctly.
4. Connect the Ductwork
- Supply and Return Ducts: Connect the supply and return ducts to the package unit’s respective ports. Ensure that the ducts are securely attached to prevent air leaks and optimize airflow.
- Seal Duct Joints: Use foil tape or duct sealant to seal all duct joints and prevent air leakage.
- Insulate Ductwork: If the ducts run through unconditioned spaces (attics, basements), consider insulating the ducts to prevent energy loss.
5. Electrical Connections
The electrical wiring should be done by a licensed electrician to ensure safety and compliance with local codes. Here’s an overview of the process:
- Power Supply: Connect the unit to a dedicated power source, ensuring the unit’s voltage and current requirements are met. Follow the manufacturer’s electrical diagram for proper connections.
- Circuit Breaker: Install an appropriately sized circuit breaker to protect the unit from electrical overload. The breaker should match the unit’s specifications.
- Control Wiring: Wire the thermostat or control panel to the package unit. This will allow you to set the desired temperature and operating mode.
- Grounding: Properly ground the unit to prevent electrical hazards. Ensure that all wiring is secure and properly connected.
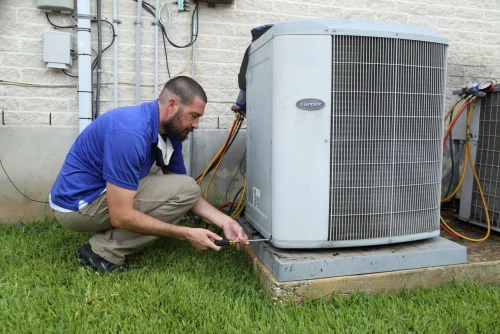
6. Connect the Refrigerant Lines
- Suction Line: Connect the suction line from the evaporator coil to the compressor on the package unit. Ensure the connection is tight and leak-free.
- Liquid Line: Connect the liquid line from the condenser coil to the expansion valve.
- Check for Leaks: After all refrigerant lines are connected, perform a leak test using nitrogen or an electronic leak detector. If any leaks are found, repair them immediately.
7. Install the Condensate Drain
Package units generate condensation that must be drained away to prevent water damage:
- Drain Line: Connect a condensate drain line to the unit’s drain port. Ensure the line is directed to an appropriate drainage location, such as a floor drain or outside the building.
- Slope the Drain Line: Ensure the drain line has a slight slope to allow gravity to move the condensate away from the unit.
- Check for Blockages: Inspect the condensate pan and drain line for any blockages or debris that could cause water buildup.
8. System Testing
After all connections are made, it’s time to test the package unit to ensure it’s operating correctly:
- Power On: Turn on the power supply and verify that the unit powers up properly.
- Check for Leaks: Check all refrigerant lines, electrical connections, and ductwork for any leaks. If any issues are found, address them immediately.
- Run the System: Set the thermostat to the desired temperature and allow the unit to run for a while. Check the system’s cooling and heating functions, ensuring that air is being circulated properly and that the unit is operating smoothly.
- Check Airflow: Verify that the airflow is consistent and that there are no strange noises or vibrations.
- Check the Condensate Drain: Ensure that the condensate is draining properly and there are no signs of water pooling around the unit.
9. Final Adjustments
After the system is running, make any final adjustments to optimize performance:
- Airflow: Adjust the dampers and vents to ensure even airflow throughout the space.
- Thermostat Calibration: Calibrate the thermostat to ensure it reads accurately and controls the unit efficiently.
- Inspect Insulation: Ensure that all refrigerant lines, ducts, and other exposed pipes are properly insulated to prevent energy loss and condensation.
10. Maintenance Tips
To keep the package unit running efficiently, regular maintenance is key:
- Change Filters: Replace air filters regularly to ensure clean airflow and prevent dirt buildup in the system.
- Check Refrigerant Levels: Ensure that the refrigerant levels are within the manufacturer’s specifications.
- Clean Coils: Clean the evaporator and condenser coils to maintain system efficiency.
- Inspect Ducts: Ensure that ducts are properly sealed and insulated.